QML の基本的な使い方
[最終更新]
(2019/06/03 00:31:13)
プログラミング/IoT の関連商品 (Amazonのアソシエイトとして、当メディアは適格販売により収入を得ています。)


最近の投稿
- Looker から Snowflake への OAuth 接続
- Looker (Google Cloud core) 30日間 フリートライアル設定
- AWS 落穂拾い (Security)
- AWS 落穂拾い (Storage)
- マイクロマウス
注目の記事
概要
Qt Quick は、こちらのページで記載した Qt フレームワークにおいて UI 作成のために利用されるライブラリです。Qt Quick で利用される言語 QML (Qt Modeling Language) について、基本的な使い方を記載します。
検証用のコード
sample.py
#!/usr/bin/python
# -*- coding: utf-8 -*-

from sys import exit, argv
from PySide2.QtWidgets import QApplication
from PySide2.QtQuick import QQuickView
from PySide2.QtCore import QUrl

def Main():
    app = QApplication(argv)
    view = QQuickView()
    url = QUrl('view.qml')
    view.setSource(url)
    view.show()
    exit(app.exec_())

if __name__ == '__main__':
    Main()
view.qml
import QtQuick 2.7
...
JavaScript の利用
プロパティを動的に生成
import QtQuick 2.7

Rectangle {
    id: rectangle
    width: 600
    height: 600

    Text {
        text: Math.random()
        y: 30
        anchors.horizontalCenter: rectangle.horizontalCenter
    }
}
QML ファイル内に記載
import QtQuick 2.7

Rectangle {
    id: rectangle
    width: 600
    height: 600

    function randomNumber() {
        return Math.random() * 360;
    }

    function getNumber() {
        return rectangle.randomNumber();
    }

    Text {
        text: rectangle.getNumber()
        y: 30
        anchors.horizontalCenter: rectangle.horizontalCenter
    }
}
JavaScript ファイルを読み込み
myscript.js
function randomNumber() {
  return Math.random() * 360;
}

function getNumber() {
  return randomNumber();
}
view.qml
import QtQuick 2.7
import 'myscript.js' as Logic

Rectangle {
    id: rectangle
    width: 600
    height: 600

    Text {
        text: Logic.getNumber()
        y: 30
        anchors.horizontalCenter: rectangle.horizontalCenter
    }
}
簡易 QML デバッグ
プリントデバッグ
import QtQuick 2.7

Rectangle {
    id: rectangle
    width: 600
    height: 600

    function myfunc() {
        console.log('xxxx')
        // console.exception('xxxx')
        // console.trace()
        return parseInt(mytext.text) + 1
    }

    MouseArea {
        anchors.fill: parent
        onClicked: mytext.text = rectangle.myfunc()
    }

    Text {
        id: mytext
        text: '0'
        y: 30
        anchors.horizontalCenter: rectangle.horizontalCenter
    }
}
出力例
console.log()
qml: xxxx
console.exception()
qml: xxxx
myfunc (file:///vagrant/work/view.qml:9)
onClicked (file:///vagrant/work/view.qml:15)
console.trace()
myfunc (file:///vagrant/work/view.qml:9)
onClicked (file:///vagrant/work/view.qml:15)
値の検証
console.assert() を利用できます。スタックトレースも出力されます。
import QtQuick 2.7

Rectangle {
    id: rectangle
    width: 600
    height: 600

    function myfunc() {
        console.assert(1 == 1, 'pass')
        console.assert(1 == 0, 'fail')
        return parseInt(mytext.text) + 1
    }

    MouseArea {
        anchors.fill: parent
        onClicked: mytext.text = rectangle.myfunc()
    }

    Text {
        id: mytext
        text: '0'
        y: 30
        anchors.horizontalCenter: rectangle.horizontalCenter
    }
}
出力例
fail
myfunc (file:///vagrant/work/view.qml:10)
onClicked (file:///vagrant/work/view.qml:16)
時間の計測
console.time() から console.timeEnd() までの時間を計測できます。
import QtQuick 2.7

Rectangle {
    id: rectangle
    width: 600
    height: 600

    function myfunc() {
        console.time('mykey1')
        // do something here...
        console.timeEnd('mykey1')
        return parseInt(mytext.text) + 1
    }

    MouseArea {
        anchors.fill: parent
        onClicked: mytext.text = rectangle.myfunc()
    }

    Text {
        id: mytext
        text: '0'
        y: 30
        anchors.horizontalCenter: rectangle.horizontalCenter
    }
}
出力例
mykey1: 0ms
実行回数の調査
ある箇所が何回実行されたかを console.count() で確認できます。
import QtQuick 2.7

Rectangle {
    id: rectangle
    width: 600
    height: 600

    function myfunc() {
        console.count('xxxx')
        return parseInt(mytext.text) + 1
    }

    MouseArea {
        anchors.fill: parent
        onClicked: mytext.text = rectangle.myfunc()
    }

    Text {
        id: mytext
        text: '0'
        y: 30
        anchors.horizontalCenter: rectangle.horizontalCenter
    }
}
出力例
xxxx: 1
xxxx: 2
xxxx: 3
インポート情報の確認
環境変数 QML_IMPORT_TRACE=1 で実行すると、以下のような情報を確認できます。
$ QML_IMPORT_TRACE=1 python sample.py
QQmlImportDatabase::addImportPath: "/home/vagrant/.pyenv/versions/2.7.15/lib/python2.7/site-packages/PySide2/Qt/qml"
QQmlImportDatabase::addImportPath: "qrc:/qt-project.org/imports"
QQmlImportDatabase::addImportPath: "/home/vagrant/.pyenv/versions/2.7.15/bin"
QQmlImports(file:///vagrant/work/view.qml)::addLibraryImport: "QtQuick" 2.7 as ""
QQmlImports(file:///vagrant/work/view.qml)::importExtension: loaded "/home/vagrant/.pyenv/versions/2.7.15/lib/python2.7/site-packages/PySide2/Qt/qml/QtQuick.2/qmldir"
QQmlImportDatabase::registerPluginTypes: "QtQuick" from "/home/vagrant/.pyenv/versions/2.7.15/lib/python2.7/site-packages/PySide2/Qt/qml/QtQuick.2"
QQmlImports(file:///vagrant/work/view.qml)::resolveType: "Text" => "QQuickText" TYPE
QQmlImports(file:///vagrant/work/view.qml)::resolveType: "Rectangle" => "QQuickRectangle" TYPE
QQmlImports(file:///vagrant/work/view.qml)::resolveType: "MouseArea" => "QQuickMouseArea" TYPE
レイアウト
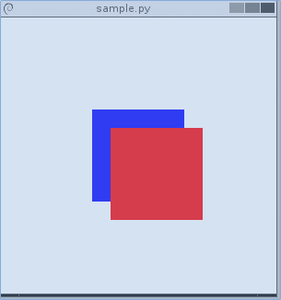
座標での指定
親の位置をもとにして x と y で相対的な座標を指定できます。
import QtQuick 2.7

Rectangle {
    id: rectangle
    width: 300
    height: 300

    Rectangle {
        x: 100
        y: 100
        width: 100
        height: 100
        color: 'blue'

        Rectangle {
            x: 20
            y: 20
            width: 100
            height: 100
            color: 'red'
        }
    }
}
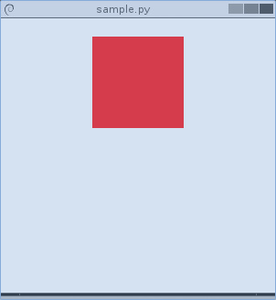
id で指定した要素との位置関係を指定
他の要素の位置を元にして anchors で位置を指定できます。以下では parent をもとにしていますが、その他に同階層の任意の要素に対して id を指定することで位置関係を指定できます。
import QtQuick 2.7

Rectangle {
    id: rectangle
    width: 300
    height: 300

    Rectangle {
        anchors.top: parent.top
        anchors.horizontalCenter: parent.horizontalCenter
        anchors.topMargin: 20

        width: 100
        height: 100
        color: 'red'
    }
}
動的に anchors を切り換える
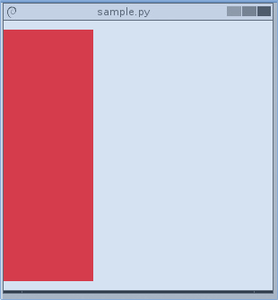
State の AnchorChanges を利用することで指定した要素の anchors を動的に変更できます。その際 Transition の AnchorAnimation も併用することで遷移時のアニメーションについて指定できます。
import QtQuick 2.7

Rectangle {
    id: rectangle
    width: 300
    height: 300

    Rectangle {
        id: mytarget
        width: 100
        height: 100
        color: 'red'
    }

    MouseArea {
        anchors.fill: parent
        onClicked: rectangle.state = 'mystate'
    }

    states: State {
        name: 'mystate'
        AnchorChanges {
            target: mytarget
            anchors.top: rectangle.top
            anchors.bottom: rectangle.bottom
        }
        PropertyChanges {
            target: mytarget
            anchors.topMargin: 10
            anchors.bottomMargin: 10
        }
    }

    transitions: Transition {
        // smoothly transit in 5 secs
        AnchorAnimation { duration: 5000 }
    }
}
遷移前
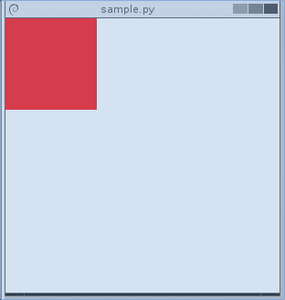
遷移後
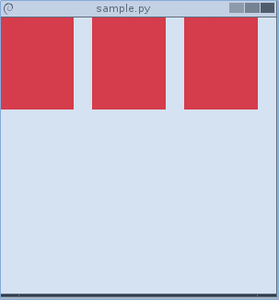
Row、Column、Grid の利用
Row、Column、Grid 等を利用すると、子要素を整列させることができます。
import QtQuick 2.7

Rectangle {
    id: rectangle
    width: 300
    height: 300

    Row {
        spacing: 20
        Rectangle { width: 80; height: 100; color: 'red' }
        Rectangle { width: 80; height: 100; color: 'red' }
        Rectangle { width: 80; height: 100; color: 'red' }
    }
}
QML ファイルの分割
この続きが気になる方は
関連ページ
概要 QT を Python から利用するためのライブラリには PyQt や PySide 等が存在します。PySide は元々 QT4 向けのライブラリでしたが、QT5 に対応するために新たに PySide2 が開発されました。PySide2 は Qt for Python ともよばれています。 Q: PySide? Qt for Python? what is the name?