- Looker から Snowflake への OAuth 接続
- Looker (Google Cloud core) 30日間 フリートライアル設定
- AWS 落穂拾い (Security)
- AWS 落穂拾い (Storage)
- マイクロマウス

概要
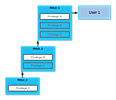
こちらのページに記載のとおり、Android アプリケーションは一つ以上の Activity、Service を含みます。Service は UI をもたず、長時間かかる処理をバックグラウンドで行うためのコンポーネントです。こちらのページの情報をもとに構築した開発環境を想定し、基本的な使い方をまとめます。
関連する公式ドキュメント
単純な Service (非同期処理なし)
Android アプリケーションにおいて、既定ではすべてのアプリケーションのスレッドはアプリケーション個別のプロセス内に生成されます。プロセス内のスレッドには、UI を操作する処理を実行する main スレッド (UI スレッド) や、バックグラウンド処理を行うための worker スレッドが存在します。以下の MyService は Service を直接継承しており、MainActivity から startService() すると、main スレッドで onStartCommand() の処理が実行されます。そのため、以下のサンプルコードに実用性はなく、一般の用途であれば、worker スレッドを利用する、後述の IntentService を継承した MyIntentService を利用すべきです。
MyService.java
onStartCommand() で main スレッドを 5 秒間占有してみます。また、onStartCommand() の返り値で、システムによって MyService が強制終了させられたときの挙動を指定できます。IntentService の場合と同様に、START_STICKY によって、サービスが Android システムによって kill されたらサービスを再作成して起動するように設定しています。
package com.example.mycompany.myapp;

import android.app.Service;
import android.content.Intent;
import android.os.IBinder;
import android.support.annotation.Nullable;
import android.util.Log;

public class MyService extends Service {

    private final String TAG = "MyService";

    @Override
    public void onCreate() {
        super.onCreate();
        Log.d(TAG, "created");
    }

    @Override
    public int onStartCommand(Intent intent, int flags, int startId) {
        Log.d(TAG, "started");
        try {
            Thread.sleep(5000);
        } catch (InterruptedException e) {
            e.printStackTrace();
        }
        Log.d(TAG, "started/done");
        return START_STICKY;
    }

    @Nullable
    @Override
    public IBinder onBind(Intent intent) {
        // https://developer.android.com/guide/components/bound-services.html
        return null;
    }

    @Override
    public void onDestroy() {
        super.onDestroy();
        Log.d(TAG, "destroyed");
    }
}
MainActivity.java
MainActivity の myStartButton/myStopButton を押すとサービスが起動/停止します。それぞれ、MyService をクラス名として設定した Explicit intent を引数にして startService() および stopService() を実行しています。
package com.example.mycompany.myapp;

import android.content.Intent;
import android.support.v7.app.AppCompatActivity;
import android.os.Bundle;
import android.util.Log;
import android.view.View;
import android.widget.Button;

public class MainActivity extends AppCompatActivity {

    private static final String TAG = "MainActivity";

    @Override
    protected void onCreate(Bundle savedInstanceState) {
        super.onCreate(savedInstanceState);
        setContentView(R.layout.activity_main);

        Button startButton = (Button)findViewById(R.id.myStartButton);
        startButton.setOnClickListener(
                new View.OnClickListener() {
                    @Override
                    public void onClick(View v) {
                        Log.d(TAG, "start service");
                        Intent intent = new Intent(MainActivity.this, MyService.class);
                        startService(intent);
                        Log.d(TAG, "start service/done");
                    }
                }
        );

        Button stopButton = (Button)findViewById(R.id.myStopButton);
        stopButton.setOnClickListener(
                new View.OnClickListener() {
                    @Override
                    public void onClick(View v) {
                        Log.d(TAG, "stop service");
                        Intent intent = new Intent(MainActivity.this, MyService.class);
                        stopService(intent);
                        Log.d(TAG, "stop service/done");
                    }
                }
        );
    }
}
AndroidManifest.xml
Activity の場合と同様に、Service コンポーネントの存在を Android システムに認識させるためには AndroidManifest.xml を編集する必要があります。
...
<manifest... package="com.example.mycompany.myapp">
    <application... >
        <activity android:name=".MainActivity">
            ...
        </activity>
        <service android:name=".MyService" />  ←追記
    </application>
</manifest>
実行例
UI がフリーズするため、警告がログに出力されています。
08-06 21:58:00.637 1153-1153/com.example.mycompany.myapp D/MainActivity: start service
08-06 21:58:00.653 1153-1153/com.example.mycompany.myapp D/MainActivity: start service/done
08-06 21:58:00.687 1153-1153/com.example.mycompany.myapp D/MyService: created
08-06 21:58:00.689 1153-1153/com.example.mycompany.myapp D/MyService: started  ←ここから
08-06 21:58:05.690 1153-1153/com.example.mycompany.myapp D/MyService: started/done  ←ここまで 5 秒間 main スレッドを占有するため UI がフリーズします。そのため↓の警告が出ています。
08-06 21:58:05.690 1153-1153/com.example.mycompany.myapp I/Choreographer: Skipped 300 frames!  The application may be doing too much work on its main thread.

08-06 21:58:11.319 1153-1153/com.example.mycompany.myapp D/MainActivity: stop service
08-06 21:58:11.320 1153-1153/com.example.mycompany.myapp D/MainActivity: stop service/done
08-06 21:58:11.321 1153-1153/com.example.mycompany.myapp D/MyService: destroyed
非同期処理ありの IntentService
MainActivity.java および AndroidManifest.xml は、前述「単純な Service (非同期処理なし)」の場合と以下の差分を除いて同じです。Service を直接継承した場合と異なり、start リクエストによって渡されたインテントを main スレッドではなく worker スレッドによってキューから一つずつ取り出して処理するため UI がフリーズすることはありません。
MainActivity.java
-    Intent intent = new Intent(MainActivity.this, MyService.class);
+    Intent intent = new Intent(MainActivity.this, MyIntentService.class);
AndroidManifest.xml
+ <service android:name=".MyIntentService" />
MyIntentService.java
package com.example.mycompany.myapp;

import android.app.IntentService;
import android.content.Intent;
import android.util.Log;

public class MyIntentService extends IntentService {

    private final String TAG = "MyIntentService";

    public MyIntentService() {
        super("MyIntentService"); // name for the worker thread
    }

    @Override
    protected void onHandleIntent(Intent intent) {
        Log.d(TAG, "handled");
        try {
            Thread.sleep(5000);
        } catch (InterruptedException e) {
            e.printStackTrace();
        }
        Log.d(TAG, "handled/done");
    }
}
実行例
08-07 17:41:36.202 2675-2675/com.example.mycompany.myapp D/MainActivity: start service  ←ボタンをタップ (一回目)
08-07 17:41:36.206 2675-2675/com.example.mycompany.myapp D/MainActivity: start service/done
08-07 17:41:36.231 2675-9955/com.example.mycompany.myapp D/MyIntentService: handled
08-07 17:41:37.445 2675-2675/com.example.mycompany.myapp D/MainActivity: start service  ←ボタンをタップ (二回目)
08-07 17:41:37.451 2675-2675/com.example.mycompany.myapp D/MainActivity: start service/done
08-07 17:41:41.234 2675-9955/com.example.mycompany.myapp D/MyIntentService: handled/done  ←5秒後、一つ目のリクエスト処理が完了
08-07 17:41:41.235 2675-9955/com.example.mycompany.myapp D/MyIntentService: handled  ←キューから次のインテントを取り出して処理開始
08-07 17:41:46.236 2675-9955/com.example.mycompany.myapp D/MyIntentService: handled/done  ←5秒後、処理完了
サービスの処理完了時に結果を返す
サービスで行う処理のうち、特に結果を返したい場合はブロードキャストや通知を利用します。
ブロードキャスト
前述の「非同期処理ありの IntentService」のサンプルコードをもとに、以下のように変更します。また、ブロードキャストでは受信したとしても Activity がバックグラウンドの場合はフォアグラウンドにはなりません。ユーザーへの完了通知を目的とする場合は後述の「通知」を利用します。
Constants.java
今回のサンプルで必要になる定数を定義します。
package com.example.mycompany.myapp;

public final class Constants {

    // 様々なブロードキャストがなされる中で、特に今回検証のために実行するブロードキャストの識別子
    public static final String MY_BROADCAST_ACTION = "com.example.mycompany.myapp.MY_BROADCAST";

    // インテントに putExtra して格納するデータを取り出すためのキー名
    public static final String EXTRA_MESSAGE = "com.example.mycompany.myapp.MESSAGE";
}
MyIntentService.java
onHandleIntent() 内でメッセージをブロードキャストします。
package com.example.mycompany.myapp;

import android.app.IntentService;
import android.content.Intent;
import android.support.v4.content.LocalBroadcastManager;
import android.util.Log;

public class MyIntentService extends IntentService {

    public MyIntentService() {
        super("MyIntentService"); // name for the worker thread
    }

    @Override
    protected void onHandleIntent(Intent intent) {
        Intent localIntent = new Intent(Constants.MY_BROADCAST_ACTION);
        localIntent.putExtra(Constants.EXTRA_MESSAGE, "my message from MyIntentService");

        // 本アプリケーションに制限して、レシーバにインテントをブロードキャスト
        LocalBroadcastManager.getInstance(this).sendBroadcast(localIntent);
    }
}
MyReceiver.java
受信時にメッセージをログに出力します。
Android Service コンポーネントの基本的な使い方