


概要
こちらのページで開発環境の構築方法をまとめた Spring Boot における OAuth2 のサンプルコードをまとめます。こちらのページで和訳した Twitter API で利用されている OAuth 1.0A と区別します。こちらのページで簡単なサンプルをまとめた Spring Security プロジェクト配下の Spring Security OAuth を利用することで、OAuth2 プロバイダ (サーバー) および OAuth2 コンシューマ (クライアント) を簡単に構築できます。
- Spring Boot OAuth2 チュートリアル
- Spring Boot ユーザーガイド / OAuth2
- Pivotal-Japan / From Zero to Hero with REST and OAuth2
OAuth2 サーバーのサンプル
OAuth2 ではアクセストークンの発行を行う認可サーバー Authorization Server と アクセストークンをもとにユーザー情報などを返す Resource Server の二つのサーバーが登場します。負荷分散などの必要がない通常の場合、これらのサーバーは同一のものになりますが、構造上分離できるということになります。それぞれ、Spring Security OAuth のアノテーションが用意されており、@EnableAuthorizationServer および @EnableResourceServer を設定するだけで、OAuth2 の基本的な機能を提供できます。
.
|-- build.gradle
|-- gradle
|   `-- wrapper
|       |-- gradle-wrapper.jar
|       `-- gradle-wrapper.properties
|-- gradlew
|-- gradlew.bat
`-- src
    `-- main
        |-- java
        |   `-- hello
        |       |-- Application.java
        |       `-- HelloController.java
        `-- resources
            `-- application.yml
build.gradle
spring-security-oauth2 を設定します。
buildscript {
    ext {
        springBootVersion = '1.5.3.RELEASE'
    }
    repositories {
        mavenCentral()
    }
    dependencies {
        classpath("org.springframework.boot:spring-boot-gradle-plugin:${springBootVersion}")
    }
}

apply plugin: 'java'
apply plugin: 'eclipse'
apply plugin: 'idea'
apply plugin: 'org.springframework.boot'

jar {
    baseName = 'gs-spring-boot'
    version =  '0.1.0'
}

repositories {
    mavenCentral()
}

sourceCompatibility = 1.8
targetCompatibility = 1.8

dependencies {
    compile('org.springframework.boot:spring-boot-starter-web')
    compile('org.springframework.security.oauth:spring-security-oauth2')
}
src/main/java/hello/Application.java
前述のとおり @EnableAuthorizationServer および @EnableResourceServer の二つのアノテーションを設定します。その際、@EnableAuthorizationServer に関する設定を二つ行っています。
OAuth2 コンシューマの登録
OAuth2 では事前にコンシューマをプロバイダである本アプリケーションに登録しておく必要があります。Spring Security OAuth は既定では application.yml などで inMemory() にコンシューマを設定できるようになっています。後述の allowFormAuthenticationForClients() を設定する都合上、ここでは Java で設定しています。コンシューマの client-id と client-secret をそれぞれ demo とし、発行されたアクセストークンで本アプリケーションに対して read と write という権限範囲 scope で許可されたリクエストを行えるようにします。認可サーバーは OAuth2 アクセストークンをいくつかの方法 authorized-grant-types で発行することができます。今回は特に authorization_code での発行を許可するように設定します。また、認可コードを含んだ状態でユーザをリダイレクトする先の URL を前方一致条件で限定することができ、ここでは検証用に http://localhost:8080 と http://oauth-callback.com を許可しています。
アクセストークンを取得する際に Basic 認証を強制しない
OAuth2 において、http://localhost:18080/myprovider/oauth/token に POST してアクセストークンの発行をリクエストする際、OAuth2 コンシューマは自身の client-id と client-secret を Basic 認証の id と password として含めます。しかしながら、後に構築するアプリケーションのように、Basic 認証に対応していないクライアントが存在するため、allowFormAuthenticationForClients() で client-id と client-secret を HTTP POST のボディに含めてリクエストすることを許可しています。
package hello;

import org.springframework.boot.SpringApplication;
import org.springframework.boot.autoconfigure.SpringBootApplication;
import org.springframework.security.oauth2.config.annotation.configurers.ClientDetailsServiceConfigurer;
import org.springframework.security.oauth2.config.annotation.web.configuration.AuthorizationServerConfigurerAdapter;
import org.springframework.security.oauth2.config.annotation.web.configuration.EnableAuthorizationServer;
import org.springframework.security.oauth2.config.annotation.web.configuration.EnableResourceServer;
import org.springframework.security.oauth2.config.annotation.web.configurers.AuthorizationServerSecurityConfigurer;

@SpringBootApplication
@EnableAuthorizationServer
@EnableResourceServer
public class Application extends AuthorizationServerConfigurerAdapter {

    public static void main(String[] args) {
        SpringApplication.run(Application.class, args);
    }

    @Override
    public void configure(ClientDetailsServiceConfigurer clients) throws Exception {
        clients.inMemory().withClient("demo").secret("demo").scopes("read", "write")
                .authorizedGrantTypes("authorization_code")
                .redirectUris("http://localhost:8080", "http://oauth-callback.com");
    }

    @Override
    public void configure(AuthorizationServerSecurityConfigurer oauthServer) throws Exception {
        oauthServer.allowFormAuthenticationForClients();
    }
}
src/main/java/hello/HelloController.java
リソースサーバとしてのエンドポイントを一つだけ追加してみます。簡単のため Authentication をすべてそのまま返していますが、実際には情報を限定して返すべきです。
package hello;

import org.springframework.web.bind.annotation.RestController;
import org.springframework.security.core.Authentication;
import org.springframework.web.bind.annotation.RequestMapping;
import org.springframework.web.bind.annotation.RequestMethod;

@RestController
public class HelloController {

    @RequestMapping(path = "/userinfo", method = RequestMethod.GET)
    Object userinfo(Authentication authentication) {
        return authentication;
    }
}
src/main/resources/application.yml
OAuth2 プロバイダ上のユーザー登録
Spring Security のページにも記載のとおり、今回のように特に設定しない場合は自動的にユーザー名 user が作成されます。今回はパスワードを mypassword と設定しました。OAuth2 コンシューマがアクセストークンで情報を取得することができるユーザーです。
パスとポートの設定
後述の OAuth2 コンシューマから本 OAuth2 プロバイダを利用する際に、ドメインが localhost で共通のため、ポート番号およびパスを設定しています。パスの設定は JSESSIONID という名称のクッキーをプロバイダとコンシューマで別々に持たせるための回避策です。OAuth2 の本質的な設定ではありません。
ログの出力設定
OAuth2 サーバーへの HTTP リクエストを確認する検証目的で、ログレベルをデバッグに設定しています。
security:
  user:
    password: mypassword

server:
  port: 18080
  context-path: /myprovider

logging:
  level:
    root: DEBUG
curl を OAuth2 クライアントとして利用
後述の Spring Boot アプリケーションなどの Web アプリケーションを OAuth2 クライアントとして利用することが一般的ですが、動作検証を兼ねて以下のコマンドを実行すると user 情報が取得できることが分かります。
read scope 認可コードの発行
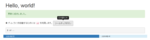
http://localhost:18080/myprovider/oauth/authorize?response_type=code&client_id=demo&redirect_uri=http://oauth-callback.com&scope=read にアクセスして、Basic 認証で user, mypassword を入力します。この Basic 認証は Spring フレームワークの都合上、簡単のため認証で利用されているだけです。OAuth2 におけるアクセストークン発行の Basic 認証と区別します。認証が通ったら、Approve を選択してから Authorize をクリックします。以下のような URL にリダイレクトされて、発行された認可コードが確認できます。
http://oauth-callback.com/?code=bbSOgq
アクセストークンの発行
OAuth2 認可サーバーは Basic 認証の -u demo:demo で OAuth2 コンシューマを識別します。
$ curl -s -u demo:demo http://localhost:18080/myprovider/oauth/token -d grant_type=authorization_code -d code=bbSOgq -d redirect_uri=http://oauth-callback.com | jq
{
  "access_token": "91c3fa7a-ac6c-479f-b779-de45236f4b67",
  "token_type": "bearer",
  "expires_in": 43199,
  "scope": "read"
}
allowFormAuthenticationForClients() しているため、以下のように Basic 認証なしでもアクセストークンを発行できます。
$ curl -s http://localhost:18080/myprovider/oauth/token -d grant_type=authorization_code -d code=bbSOgq -d redirect_uri=http://oauth-callback.com -d client_id=demo -d client_secret=demo | jq
{
  "access_token": "91c3fa7a-ac6c-479f-b779-de45236f4b67",
  "token_type": "bearer",
  "expires_in": 43047,
  "scope": "read"
}
アクセストークンの利用
$ curl -s http://localhost:18080/myprovider/userinfo -H 'Authorization: Bearer 91c3fa7a-ac6c-479f-b779-de45236f4b67' | jq
{
  "authorities": [
    {
      "authority": "ROLE_USER"
    }
  ],
  "details": {
    "remoteAddress": "0:0:0:0:0:0:0:1",
    "sessionId": null,
    "tokenValue": "91c3fa7a-ac6c-479f-b779-de45236f4b67",
    "tokenType": "Bearer",
    "decodedDetails": null
  },
  "authenticated": true,
  "userAuthentication": {
    "authorities": [
      {
        "authority": "ROLE_USER"
      }
    ],
    "details": {
      "remoteAddress": "0:0:0:0:0:0:0:1",
      "sessionId": "01D3FAB19EEB918904162D84AF8D1F85"
    },
    "authenticated": true,
    "principal": {
      "password": null,
      "username": "user",
      "authorities": [
        {
          "authority": "ROLE_USER"
        }
      ],
      "accountNonExpired": true,
      "accountNonLocked": true,
      "credentialsNonExpired": true,
      "enabled": true
    },
    "credentials": null,
    "name": "user"
  },
  "clientOnly": false,
  "oauth2Request": {
    "clientId": "demo",
    "scope": [
      "read"
    ],
    "requestParameters": {
      "code": "bbSOgq",
      "grant_type": "authorization_code",
      "scope": "read",
      "response_type": "code",
      "redirect_uri": "http://oauth-callback.com",
      "client_secret": "demo",
      "client_id": "demo"
    },
    "resourceIds": [],
    "authorities": [],
    "approved": true,
    "refresh": false,
    "redirectUri": "http://oauth-callback.com",
    "responseTypes": [
      "code"
    ],
    "extensions": {},
    "grantType": "authorization_code",
    "refreshTokenRequest": null
  },
  "credentials": "",
  "principal": {
    "password": null,
    "username": "user",
    "authorities": [
      {
        "authority": "ROLE_USER"
      }
    ],
    "accountNonExpired": true,
    "accountNonLocked": true,
    "credentialsNonExpired": true,
    "enabled": true
  },
  "name": "user"
}
OAuth2 クライアントのサンプル
以下のサンプルにおいて、いずれも Gradle プロジェクト構成および build.gradle の設定内容は前述「OAuth2 サーバーのサンプル」と同じです。