「AWS IoT ボタン」を用いずにインターネット経由でスマホによるラジコン操作
制御プログラムを作る (3日目)
3ページ目 (全 6 ページ)

- 任意の言語で Raspberry Pi デジタル入出力、アナログ出力 (PWM)
- Raspberry Pi で I2C を利用するための設定
- Raspberry Pi アナログ入力 (I2C A/D コンバータ)
- PayPal エクスプレスチェックアウト (API 決済) の使い方
- Raspberry Pi パッケージ管理コマンド (NOOBS)
- Arduino で作る 7 セグメント LED タイマー
- Arduino で作る温度と気圧の計測基板
- 部屋の温度をツイートする Arduino (外出先から制御)
- 手を振りかざすと白旗を上げて降参する Arduino
- 虚仮威しの防犯装置 (Arduino)
注目の記事

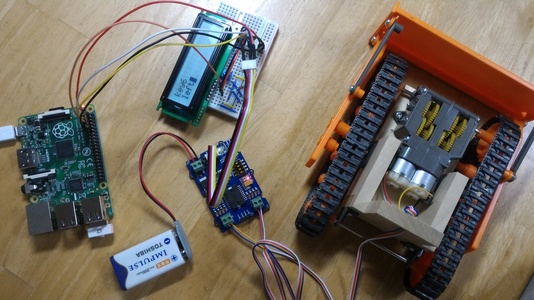
制御プログラム
websocket_clients のうち、Ruby のサンプルコードをもとにしました。ruby はバージョンが 2.1.3 のものを使用しました。依存 Gem が一つだけありますので、事前にインストールしておきます。
sudo gem install websocket-client-simple -v 0.3.0
bulldozer.rb
#!/usr/bin/ruby
# -*- coding: utf-8 -*-
require 'json'
require 'logger'
require 'websocket-client-simple'

API_TOKEN = 'XXXX-XXXX-XXXX-XXXX'
API_ENDPOINT = 'wss://api.qoosky.io/v1/controller/actuator/ws'
LCD_PIN = 4

$logger = Logger.new STDOUT
$last_time = Time.now

$speed = 70 # 9V 電源で 2.5V 程度の計算になります。

def lcd_update(key)
  line1 = ["0x00 0x01", # クリア
           "0x00 0x02", # HOME
           "0x80 0x6b", "0x80 0x65", "0x80 0x79", # key
           "0x80 0x#{(48+key).to_s(16)}",
           "0x80 0x20", "0x80 0x#{($speed/70.0*2.5 + 48).round.to_s(16)}", "0x80 0x76", # 0-9v
           "0x00 0xc0"] # 改行
  case key
  when 3
    line2 = %w(73 70 65 65 64 20 75 70) # speed up
  when 4
    line2 = %w(73 70 65 65 64 20 64 6f 77 6e) # speed down
  when 5
    line2 = %w(66 6f 72 77 61 72 64) # forward
  when 8
    line2 = %w(62 61 63 6b 77 61 72 64) # backward
  when 6
    line2 = %w(6c 65 66 74) # left
  when 7
    line2 = %w(72 69 67 68 74) # right
  else
    line2 = %w(75 6e 64 65 66 69 6e 65 64) # undefined
  end
  line1.each{|ch| system "i2cset -y 1 0x50 #{ch}"}
  line2.each{|ch| system "i2cset -y 1 0x50 0x80 0x#{ch}"}
end

def motor_drive(key)
  hex = $speed.to_s(16)
  case key
  when 3 # speed up
    $speed += 10
    hex = '00'
  when 4 # speed down
    $speed -= 10
    hex = '00'
  when 5 # forward
    system "i2cset -y 1 0x0f 0xaa 0x05 0x01 i"
  when 8 # backward
    system "i2cset -y 1 0x0f 0xaa 0x0a 0x01 i"
  when 6 # left
    system "i2cset -y 1 0x0f 0xaa 0x09 0x01 i"
  when 7 # right
    system "i2cset -y 1 0x0f 0xaa 0x06 0x01 i"
  else
    hex = '00'
  end
  system "i2cset -y 1 0x0f 0x82 0x#{hex} 0x#{hex} i"
end

begin
  # WebSocket SSL クライアント
  ws = WebSocket::Client::Simple.connect API_ENDPOINT

  # コネクション確立時のイベント
  ws.on :open do
    if ws.handshake.valid?
      $logger.info 'Successfully connected to the API server.'
      ws.send({ token: API_TOKEN }.to_json)
      # LCD バックライト ON
      system "gpio -g mode #{LCD_PIN} out"
      system "gpio -g write #{LCD_PIN} 1"
      # LCD 初期化
      system "i2cset -y 1 0x50 0x00 0x01"
      system "i2cset -y 1 0x50 0x00 0x38"
      system "i2cset -y 1 0x50 0x00 0x0f"
      system "i2cset -y 1 0x50 0x00 0x06"
    else
      ws.emit :error, 'websocket handshake failed.'
    end
  end

  # エラー時のイベント
  ws.on :error do |err|
    $logger.error "An unexpected error has occurred: #{err}"
    ws.emit :close
  end

  # コネクション切断時のイベント
  ws.on :close do |e|
    raise "Connection closed."
  end

  # メッセージ受信時のイベント
  ws.on :message do |msg|
    $logger.info "received: #{msg}"
    json = JSON.parse msg.to_s
    if key = json['pushedKey']
      lcd_update(key)
      motor_drive(key)
    end
    $last_time = Time.now
  end

  # メインスレッド待機
  timer = 100
  loop do
    if (timer == 0)
      timer = 100
      msg = "keep-alive message."
      ws.send msg
      $logger.info "sent: #{msg}"
    else
      timer -= 1
      if Time.now - $last_time > 0.5
        $logger.info("motor stop")
        system "i2cset -y 1 0x0f 0x82 0x00 0x00 i"  # モーター停止
      end
    end
    sleep 0.1
  end

rescue => e
  $logger.warn "An error occurred: #{e}\nretrying..."
  sleep 5
  retry # 再試行

ensure
  # 終了時に消灯して初期化
  system "gpio -g write #{LCD_PIN} 0"
  system "i2cset -y 1 0x50 0x00 0x01"
end
実行方法
ruby bulldozer.rb
動作概要
ボタン番号に応じて以下の動作をします。
| ボタン番号 | 動作 |
|---|---|
| 1 | 未定義 |
| 2 | 未定義 |
| 3 | 加速 (初期値は 9V 電源でモーター電圧 2.5V) |
| 4 | 減速 (初期値は 9V 電源でモーター電圧 2.5V) |
| 5 | 前進 |
| 6 | 左回転 |
| 7 | 右回転 |
| 8 | 後退 |
10 秒毎に keep-alive メッセージを送信してサーバーからの切断を防ぎます。ネットワーク障害などが原因でコネクションが切断された時は自動で再接続します。加速と減速は電源電圧が低下してきた場合に利用します。加速しすぎるとモーターが故障する原因になりますので注意してください。
試験的に操作してみます。
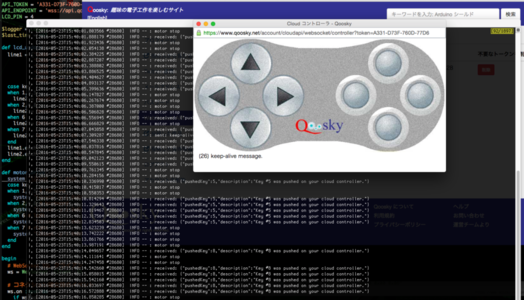
前進、後退、右回転、左回転の操作ができることを確認します。回線速度に依存する部分もありますが、反応もリアルタイムです。